Selasa, 21 Jun 2016

Redmi Note 3g - How to install MTK VCOM USB Drivers

How to install MTK VCOM USB Drivers

Steps to install driver for Windows 7/8:

  1. Extract the downloaded driver into your hard-drive.
  2. Now open Device Manager in your PC by right clicking on My Computer and then click on Manage.

    Computer Management
  3. Next go to Device Manager in that and click on your PC name and then click on Add legacy hardware.
    Add Legacy Hardware
  4. Now in Add Hardware Wizard click on Next >> Install the Hardware that I manually select from a list (Advanced) >> Show All Devices >> Next >>Have a Disk >> Browse, Now select the any inf file from where you extracted the downloaded drivers.
  5. Select MTK USB Port, click Next.
    Select MTK USB Port
  6. That's it. If you want, in the Device manager, you can uninstall the new device (with exclamation mark !) but DO NOT uninstall the driver.

Steps to install driver for Windows 10.1:

First you need to disable Windows 10 64 bit driver signature enforcement:

  1. On your 64 bit Windows 10 desktop click on Start then on Settings.
    Start > Settings
  2. Click on Update & security.
    Update & Security
  3. Click on Recovery and under Advanced startup click on Restart now button.
    Recovery > Restart Now
  4. Click on Troubleshoot then on Advanced options.
  5. Click on Startup Settings then on Restart button.
  6. The computer will restart with the Startup Settings screen.
  7. To disable the driver signature enforcement until next restart press on number key 7 or F7 on your keyboard.
  8. After restart you can proceed with the unsigned MTK drivers installation for your 64 bit Windows. Please use steps to install driver for Windows 7/8 above.
  9. After you install the unsigned drivers, to use them again in the future, you have to repeat this procedure.

Redmi Note 3G - Fix Bootloop


Sebelum ini aku dah berjaya downgrade dari MIUI8 ke MIUI7. Semuanya okay kecuali masalah NVRAM WARNING tu. Sebab ROM Global tidak didatangkan dengan fungsi root, jadi aku cuba guna cara lain dan akibatnya aku dapat masalah bootloops.

Bootloops

Bootloops ini adalah masalah bila handphone akan sentiasa reboot. Bile aku tekan butang POWER, handphone akan terpasang dan akan menunjukkan logo Xiaomi (Mi). Kemudian logo ini akan berkelip sekali dan logo Powered by Android akan turut keluar dibahagian bawah logo Xiaomi. Logo ini akan terus ada sehingga ia berkelip sekali lagi dan akan reboot semula. Perkara ini akan berulang-ulang walaupun aku dah tinggalkan phone ni berjam-jam. Memang tidak akan dapat masuk ke dalam paparan utama MIUI7. Sebab bengang, aku siap campak handphone, tapi tak okay jugak.

Cara untuk memberhentikan reboot ini adalah hanya dengan mencabutkan bateri sahaja.

Jadi sebab dah pernah berlaku, aku pun carilah balik cara-cara nak selesai masalah ini. Nak beli handphone baru tengah nak raya ni memang sakitla....


How to fix bootloop?

What you need:

Please follow this setup to install MTK Driver

Steps to fix bootloops:

  1. Extract the downloaded file.
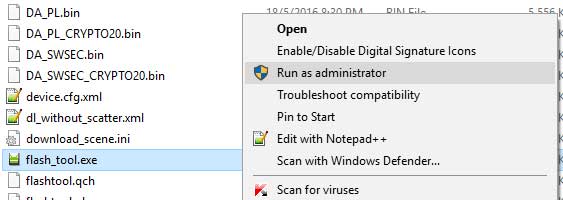
  2. Open the extracted folder and find flash_tool.exe. Run as administrator.
    Run as administrator
  3. Click Yes for User Account Control.
  4. Extract the Fastboot ROM.
  5. In the SPflash Tool, click Scatter-Loading and find for MT6592_Android_scatter.txt file inside extracted Fastboot ROM folder.
  6. Now take out your battery phone and SD Card. (Don't put it back till finish flashing)
  7. Press Download in SPFlash Tool. NOTE: CHECK USRDATA OPTION IF YOU NEED OLD BACKUP.
    Click Download
  8. Connect your phone to PC.
  9. If do it properly, you will see yellow loading bar. Wait till it finish.
  10. You'll see "Download OK" status after successfully flashing.
This ROM doesn't come with root function, so before you update to latest version (V7.3.1.0.KHDMIDD - MIUI7) , root your phone to solve the NVRAM problem. I personally use this file. The root will gone after you flash to new ROM.

HM_Note_3G_SuperSU.zip

  1. Place the downloaded file into your internal storage.
  2. Go to Folder Tools > Updater.
  3. Click (...)
  4. Select "Choose update package".
  5. Select your HM_Note_3G_SuperSU.zip in your internal storage.
  6. Wait till it finish flashing. 
  7. Follow instruction to restore your Wi-fi and Bluetooth MAC Address files.

Redmi Note 3G - Downgrade MIUI8 to MIUI7

Redmi Note 3G

Sudah berbulan-bulan aku pakai ROM MIUI7 China Developer version untuk handphone Redmi Note 3G aku. Hampir setiap minggu akan ada update baru dengan ciri-ciri yang bagi aku agak menarik. Walaupun berdepan dengan masalah tulisan cina yang kadang-kadang masih ada di dalam beberapa app dari Xiaomi, tapi sebab nak keep up-to-date punya pasal, aku tetap bersabar. Lagipun ROM ni disediakan fungsi 'root'.

Minggu lepas seperti biasa dapat lagi update baru. Disebabkan aku set auto download, update tu terus download bila ada sabungan wi-fi. Aku pun terus pilih untuk pasangkan ke dalam handphone. Siap pasang, rupa-rupanya major update, MIUI8. Paparan memang cantik, scroll-down menu pun menarik dan terdapat beberapa ciri baru yang menarik dalam MIUI8 ni.

MIUI8
ROM versi China ni sebenarnya tidak mesra app dari Google sebab dah undang-undang China sekat produk Google. Jadi ROM ni tidak didatangkan sekali dengan Google Account Manager, Gmail, Google Play Service, Play Store, Google Calendar dan semua app dari Google. Jadi nak guna app ni kena pasang menggunakan Google Installer. Selama ini tidak ada masalah tetapi untuk MIUI8 ni, aku langsung tak dapat nak pasang Google App. Antara masalah aku:
  1. Email baru tak masuk dalam Gmail
  2. Tak dapat update event dalam Google Calendar
  3. Contact tak update
  4. Langsung tak boleh masuk Google Play Store
Jadi aku buat keputusan untuk downgrade ke MIUI7 Global version.


Before you start!

Please make a backup for all your important files. My Note 3G give "NVRAM WARNING Err = 0x10" every time I do a clean wipe out. So make a copy of your Bluetooth and WiFi MAC address.

To fix NVRAM Err = 0x10, please follow this link.

How to Fix NVRAM Err = 0x10


How to backup Wifi and and Bluetooth MAC address

What you need:
Step to backup:
  1. Turn off your Wifi and Bluetooth adapter.
  2. Start you root file manager and locate the filenamed Wifi and Bluetooth in the location Data/Nvram/APCFG/APRDEB, make a copy of this on your phones SD card
  3. Copy this file to your PC. Please keep this file safely because you may need it every time you flash (full wipe out) to new firmware.
Step to restore:
  1. Turn off your Wifi and Bluetooth adapter.
  2. Start you root file manager and locate the filenamed Wifi and Bluetooth in the location Data/Nvram/APCFG/APRDEB, delete the files.
  3. Copy your backup Wifi and Bluetooth MAC address files from your SD card and paste it in Data/Nvram/APCFG/APRDEB
  4. Please change the file permission by selecting the file and go to Properties.
  5. Change the permision to R--R--R-- . (Read permission and no Write or execute permission.)

Downgrade MIUI8 to MIUI7

What you need:
  1. ROM MIUI7 Global Version
Step to downgrade:
  1. Copy the downloaded ROM to your SD Card.
  2. Go to Folder Tools > Updater.
  3. Click (...) - Upper right
  4. Select "Choose update package".
  5. Select your downloaded ROM.
  6. Wait till it finish flashing. 
  7. After it fully restart, go to Folder Tools > Updater.
  8. Click (...) 
  9. Now select "Reboot to recovery mode". 
  10. In recovery mode, use your volume button to highlight "Wipe and Reset". Use power button to select. 
  11. Select "Wipe all data" (your external storage will not be wipe out, so don't worry). 
  12. Go back to Mainmenu and Reboot to system. 
  13. Done. 

Ahad, 19 Jun 2016

Freeletics (Minggu #7)

Minggu #07
Minggu ke-2 Freeletics dalam keadaan berpuasa. Seperti minggu lepas aku buat sebelum berbuka dalam jam 6.00 petang. Sebab bila badan dah tak larat sangat boleh rehat tunggu waktu berbuka. Kalau buat awal (jam 5 petang), lambat pula nak menunggu berbuka. Kalau buat lepas Terawih, rasa susah nak tidur pulak lepas tu dan susah nak bangun sahur sebab tak cukup tidur. Jadi masih kekalkan jam 6.00 petang dan aku rasa adalah masa yang terbaik untuk Freeletics ni.

Log Minggu #7

Tarikh
(Hari)
Jogging
 Workout
(Masa)
13/6/2016
(Isnin)
-
Athena - Standard
(08:47)
Morpheus - Standard
(05:25)
Metis - Standard
(08:36)
14/6/2016
(Selasa)
-
2x Metis - Endurance
(09:44)
Nyx - Standard
(11:01)
Morpheus - Standard
(08:48)
15/6/2016
(Rabu)
-
50 Burpees
(05:18)
50 Sit Ups
(02:52)
Persephone - Endurance
(12:33)
16/6/2016
(Khamis)
-
2x Nyx - Standard
(21:57)
50 Push Ups
(02:03)
17/6/2016
(Jumaat)
-
Prometheus - Standard
(19:38)
18/6/2016
(Sabtu)
 -
Aphrodite
(40:01)
19/6/2016
(Ahad)
 -
-
Menu Minggu #07


Minggu ni memang banyak peningkatan dari jumlah masa. Semua dapat "Personal Best". Tak seperti minggu lepas yang rasa macam tak cukup nafas, minggu ni rasa lebih bertenaga. Mungkin badan dah semakin ringan dan biasa dengan keadaan berpuasa. Walaupun sebelum buat workout memang dalam fikiran rasa macam tak larat nak buat, tetapi bila dah mula, rasa lain. Lebih-lebih lagi kalau tengok dalam app ada yang dah siap buat menu, memang lebih gigih nak ber"Freeletics".

Cabaran Freeletics di bulan puasa ni bukan sahaja sebab fizikal tetapi juga mental. Lebih-lebih lagi buat yang ada burpees seperti Aphrodite yang ada 5 pusingan. Memang rasa macam nak berhenti setiap kali buat burpees. Memang mental....

Metis dan Aphrodite, workout yang ada burpees. Memang kena fikir I love burpess...I love burpees saja nak counter rasa penat tengah buat workout. Kalau Metis ok lagi sebab bermula dengan 10 dan paling banyak hanya 25. Tapi kalau Aphrodite, mula-mula dah makan tenaga, 50 burpess, 50 squats dan 50 situps. Memang nak berhenti saja rasanya.

Berat badan minggu ni kalau pakai penimbang Xiaomi aku tu = 69 kg. Timbang lepas berbuka, kalau penimbang lain mungkin 69-70 kg. Apa-apa pun dah mencapai target awal untuk bulan ni. Lepas ni nak turun lagi 10 kg. Agak-agaknya bila "Pre-weigh in Day" untuk Biggest Loser Challenge 2016 ni, berapa berat agaknya?

Khamis, 16 Jun 2016

Windows: Automatic Login


Biasanya kalau di rumah bila buka Windows, memang nak cepat terus masuk ke Desktop tanpa ada login. Jadi macam mana nak buat auto login ni. Tetapi sebelum itu, pastikan anda hanya lakukan autologin ini di komputer persendirian di rumah atau tempat-tempat yang anda yakin selamat. Biasa aku buat pada komputer HTPC (Home Theater PC). Jadi bila hidupkan, akan terus masuk ke paparan Desktop atau perisian HTPC yang ada.

Untuk Windows 10 (versi lain lebih kurang sama)
  1. Click pada butang Search (simbol Kanta Pembesar).
    Butang Search (Magnifying Glass)
  2. Taip netplwiz, tekan netplwiz.
    Taip netplwiz
  3. Pilih akaun yang anda mahu masuk secara automatik (a). Kosongkan kotak (unchecked) "User must enter a user name and password to use this computer" (b). Tekan OK (c).
    User account
  4. Masukkan username dan password untuk akaun. Tekan OK.
    Masukkan username dan password akaun
Ok, siap.